TI-Nspire & Arduino を利用した温度計 1、デモを再現する。
まず ASI Temperature - ticalc.org に紹介されているデモを再現してみる。
TI-Nspire はハンドヘルド、マイコンボードは Arduino Leonardo、温度センサーは DS18B20 を使う。
手順:
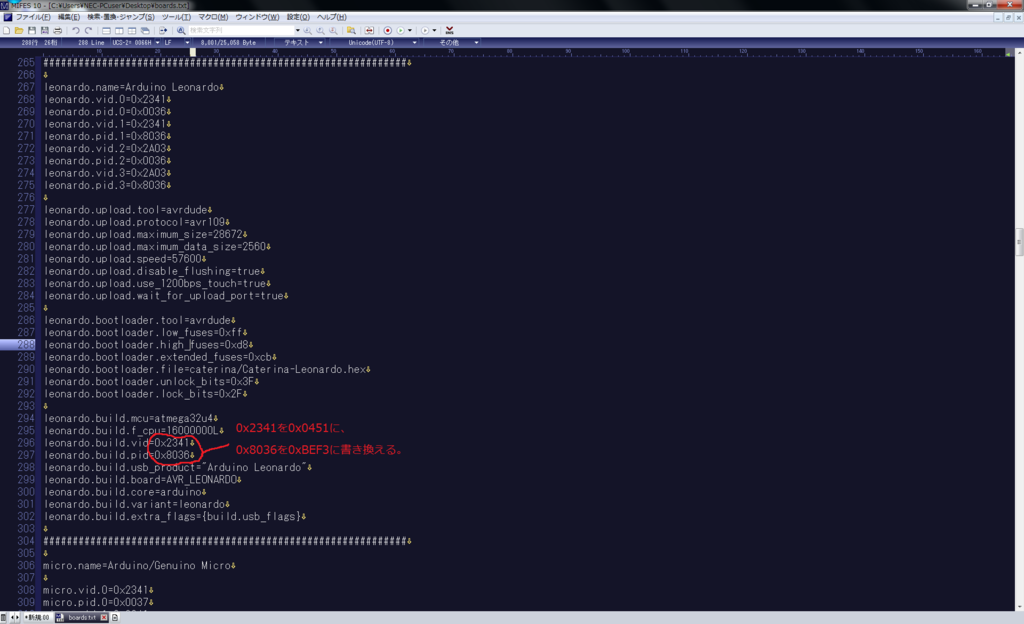
1. (Student Software しか使わない場合は 1. の作業は不要)C:\Program Files (x86)\Arduino\hardware\arduino\avr\boards.txt を下のように vid=0x0451、pid=0xBEF3 に書き換えて Leonardo を LaunchPad に偽装する。

2. http://playground.arduino.cc/Learning/OneWire の[latest version of the library]リンクをクリックして OneWire ライブラリーをダウンロードする。IDE を起動し、[スケッチ]→[ライブラリをインクルード]→[.ZIP形式のライブラリをインストール...]の順に選択し、今ダウンロードした zip ファイルを選択する。
3. https://github.com/milesburton/Arduino-Temperature-Control-Library にアクセスし、[Clone or download]→[Download ZIP]の順にクリックして zip ファイルをダウンロードする。2. と同じ手順でライブラリをインストールする。
4. 下のスケッチ(Author: Jim Bauwens)をコンパイルして Leonardo に転送する。
/*
    This program is free software: you can redistribute it and/or modify
    it under the terms of the GNU General Public License as published by
    the Free Software Foundation, either version 3 of the License, or
    (at your option) any later version.

    This program is distributed in the hope that it will be useful,
    but WITHOUT ANY WARRANTY; without even the implied warranty of
    MERCHANTABILITY or FITNESS FOR A PARTICULAR PURPOSE.  See the
    GNU General Public License for more details.

    You should have received a copy of the GNU General Public License
    along with this program.  If not, see <http://www.gnu.org/licenses/>.
*/

#include <OneWire.h>
#include <DallasTemperature.h>

#define ONE_WIRE_BUS 10

OneWire oneWire(ONE_WIRE_BUS);
DallasTemperature sensors(&oneWire);
DeviceAddress thermometer;

void setup(void)
{
  Serial.begin(115200);

  sensors.begin();
  sensors.getAddress(thermometer, 0);
  sensors.setResolution(thermometer, 12);
}

float getTemperature(DeviceAddress deviceAddress)
{
  sensors.requestTemperatures();
  return sensors.getTempC(deviceAddress);
}

void loop(void)
{
  float temp;

  if (Serial.available() > 0) {
     char c = Serial.read();
     switch (c) {
      case 'T':
       temp = getTemperature(thermometer);
       Serial.write('T');
       Serial.print(temp);
       Serial.write(';');
       break;
      default:
       Serial.print("E;");
     }
  }

}
5. 下のスクリプトをハンドヘルドに転送する。
------------------------------------------------------
-- Reads temperature values from a temperture probe --
-- connected to an Arduino Leonardo                 --
-- (C) 2016 Jim Bauwens                             --
-- tiplanet.org                                     --
------------------------------------------------------

--  This program is free software: you can redistribute it and/or modify
--  it under the terms of the GNU General Public License as published by
--  the Free Software Foundation, either version 3 of the License, or
--  (at your option) any later version.

--  This program is distributed in the hope that it will be useful,
--  but WITHOUT ANY WARRANTY; without even the implied warranty of
--  MERCHANTABILITY or FITNESS FOR A PARTICULAR PURPOSE.  See the
--  GNU General Public License for more details.

--  You should have received a copy of the GNU General Public License
--  along with this program.  If not, see <http://www.gnu.org/licenses/>.


platform.apiLevel = '2.7'

require 'asi'

local connected = false
local scanning = true
local global_port
local temp = "-.--C"


---------------------------
-- Set temperature value --
---------------------------

function setTemp(t)
	temp = t .. "C"

	platform.window:invalidate()
end

---------------------------------
-- Request temperature value   --
-- Will send 'T' and read port --
---------------------------------

function requestTemp()
	if global_port then
		global_port:write('T')
		global_port:read()
	end
end

--------------------
-- Scan for ports --
--------------------

function startScanning()
	asi.startScanning(portFoundCallback)
	scanning = true

	platform.window:invalidate()
end

----------------------------------
-- ASI state change callback    --
-- If ASI is on, start scanning --
----------------------------------

function asiStateCallback(state)
	if state == asi.ON then
		startScanning()
	end
end

--------------------------------
-- Port found callback        --
-- Will try to connect to the --
-- discovered port            --
--------------------------------

function portFoundCallback(port)
	port:connect(connectionCallback)
end

------------------------------------------
-- Port connection state callback       --
--                                      --
-- On connection it will stop scanning, --
-- set the read listeneren and send an  --
-- initial temperature probe            --
--                                      --
-- On disconnection it will start to    --
-- scan again for ports                 --
------------------------------------------

function connectionCallback(port, event)
	if event == asi.CONNECTED then
		connected = true

		asi.stopScanning()
		scanning = false

		port:setReadListener(readCallback)
		global_port = port

		requestTemp()

	elseif event == asi.DISCONNECTED then
		connected = false
		temp = "-.--C"

		startScanning()
	end

	platform.window:invalidate()
end

-------------------------------------------------
-- Called after data is read from the device   --
-- Data is send with the format 'XDATA;' where --
-- X is used as data type identifier           --
-------------------------------------------------

function readCallback(port)
	local data = port:getValue()

	if data then
		local response = data:split(';')
		-- there could have been multiple packets send
		-- we need to handle them individually
		for k,v in ipairs(response) do
			doResponse(v:sub(1,1), v:sub(2))
		end
	end
end

----------------------------
-- Handle device response --
----------------------------

function doResponse(rtype, data)
	if rtype == 'T' then
		setTemp(data)
		-- After receiveing temperature, probe for an updated temperature
		requestTemp()
	end
end

-------------------------------------------
-- Start listening for ASI state changes --
-------------------------------------------

function on.construction()
	timer.start(5)
	asi.addStateListener(asiStateCallback)
end

------------------------------------
-- Force temperature probe update --
------------------------------------

function on.enterKey()
	requestTemp()
end

function on.tabKey()
	-- fake temperature
	temp = "13.42C"
	platform.window:invalidate()
end

function on.timer()
	-- request at least every 5s an update
	requestTemp()
end

---------------------
-- Draw everything --
---------------------

function on.paint(gc, x, y, width, height)
	gc:setFont("sansserif", "r", 7)
	gc:drawString("Connected: " .. tostring(connected) .. ", scanning: " .. tostring(scanning), 2, 2, "top")

	gc:setFont("serif", "b", 24)
	gc:setColorRGB(0xFF0000)

	local w,h = gc:getStringWidth(temp), gc:getStringHeight(temp)
	gc:drawString(temp, (width-w)/2, (height-h)/2, "top")
end
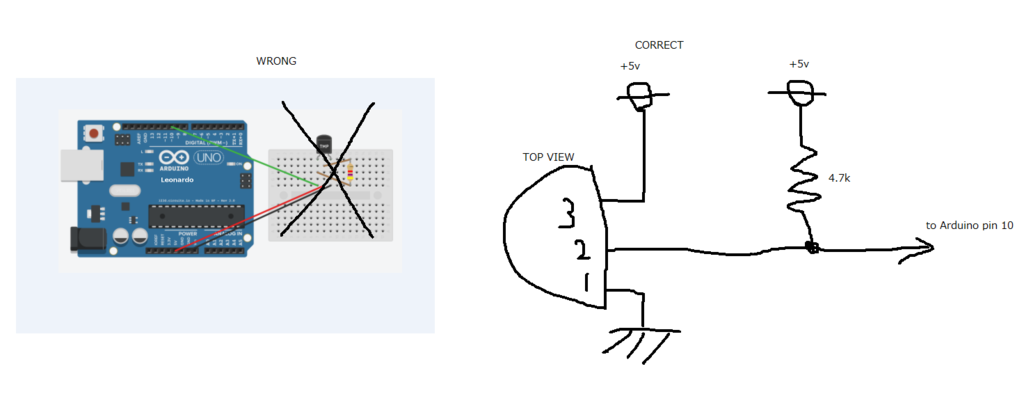
6. 温度センサー(DS18B20)と Leonardo とを下のように接続する。上の参考 URL にある接続図は間違っているので注意が必要。あとはハンドヘルドをホストにして Leonardo に接続し、5. のスクリプトを実行すれば温度が表示される。
